Saturday, March 12, 2016

Using Youtube API to Download Video by Using Python

youtube3k

Youtube Download Video

偶爾寫寫工作以外的程式,也是很有趣的事情。
這支程式,快速的從Youtube下載新三國影片,很多集,一次全部下載,我實在太愛這部片了。
用python寫的,只是想很快地把這件事做完,程式亂七八糟的,我也不想整理了。

不多說了,以下為代碼。
Developer_key需要自己去申請。

# -*- coding: utf-8 -*-
#!/usr/bin/python
from apiclient.discovery import build
from apiclient.errors import HttpError
from oauth2client.tools import argparser
import dl
DEVELOPER_KEY = "AIXXXXXXXXXXXXXXXXXXXXXXXXXXXXXXXXXXXXX"
YOUTUBE_API_SERVICE_NAME = "youtube"
YOUTUBE_API_VERSION = "v3"
BaseURL='https://www.youtube.com/watch?v='
def youtube_search(options, search_index):
  youtube = build(YOUTUBE_API_SERVICE_NAME, YOUTUBE_API_VERSION,
    developerKey=DEVELOPER_KEY)

  options.q = search_index
  search_response = youtube.search().list(
    q=search_index,
    part="id,snippet",
    maxResults=50#options.max_results,
  ).execute()
  videos = []
  channels = []
  playlists = []
  for search_result in search_response.get("items", []):
    if search_result['snippet']['title']==options.q:
        linkurl = BaseURL + search_result['id']['videoId']
        print linkurl
        print 'got it'
        dl.download(linkurl)
        break;
    else:
        continue
  print ' cannot find the video: %s '%options.q


if __name__ == "__main__":
  argparser.add_argument("--q", help="Search term", default="三國")
  argparser.add_argument("--max-results", help="Max results", default=50)
  args = argparser.parse_args()
  print args
  for loop in range(1,100):
      if loop <10:
         search_index=u'新三國演義 2010 DVD 0%s'%loop
      else:
         search_index=u'新三國演義 2010 DVD %s'%loop

      print 'search %s'%search_index
      try:
        youtube_search(args, search_index)
      except HttpError, e:
        print "An HTTP error %d occurred:\n%s" % (e.resp.status, e.content)
        

Golang Interface Explanation

golangInterface

The Explanation for Golang's Interface

Golang的Interface一直以來都處在一種模糊的想法,無法去確定為什麼需要這樣的東西,而又對程式帶來什麼樣的好處。 我重新思考了一下Interface並藉此記錄下來。 Interface至少有兩個用法,
1. 對變數不假設型態,比如map的Docker type。這是很容易了解的,所以不需要做太多的解釋。
2. 對Method的抽象(abstract)組合(composition)。
最主要我想了解的是第二個用法。

我們在Google上常常會看到類似以下範例來解釋Interface。

package main

import (
    "fmt"
)

type Geometry interface {
    area() (error, float64)
}

type Rect struct {
    width  float64
    height float64
}

func (R Rect) area() (error, float64) {
    return nil, R.width * R.height * 2
}

type Circle struct {
    radius float64
}

func (C Circle) area() (error, float64) {
    return nil, C.radius * C.radius * 3.14
}

func Measure(g Geometry) (error, float64) {
    _, ss := g.area()
    fmt.Println(ss)
    return nil, ss
}


func main() {
    fmt.Println("hah")
    rr := Rect{width: 3, height: 2}
    Measure(rr)
    cc := Circle{radius: 2}
    Measure(cc)
}

傳統的做法,可能在main function中直接使用Rect.area()Circle.area()來計算area。
而Interface就是想取代這樣的概念,能否藉由一個統一的接口來獲得area,比如Measure function,透過此統一接口(interface), Measure(Rect) or Measure(Circle),來提供Service。
這裏我強調Service正是我體悟到Interface的目的,如果你想懂了Service的概念,應該這篇文章就讀到此處即可了。
其實跳出來想,如果有一個Service可以用任何變數型態帶入,都會return相應的結果,這樣是不是很棒呢?! 這就是我強調Service的由來,而此概念可以透過Interface來完成。
當然,對於Programmer來講他除了要寫傳統的代碼架構,他還得花時間多些一層Interface提供服務。
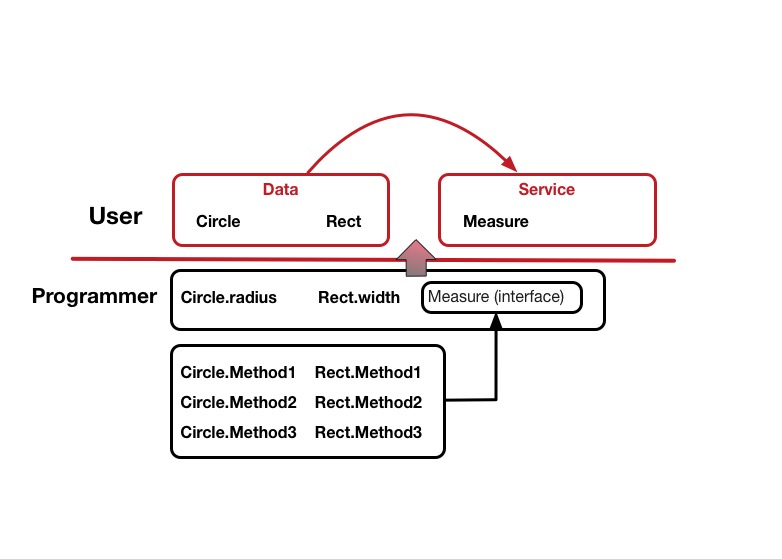
而對User來講,他只看到Data本身,變數需要填入的數值外,就是統一接口(interface)所提供的Service。

為了更清楚的描述,花了半小時畫了如下圖。

透過上圖,我們可以清楚地看到,透過Interface,Programmer的抽象化Method後,User可以得到單一入口的Service。
基本上Programmer本身是需要做更多的事情的,但對User來講, 如何調用函數的問題,就被淡化掉了,因為變成了統一的接口(Measure Function)。 上圖簡單的說就是,Programmer提供了Data與Service內容,給User,而User就是填滿Data並放入統一的接口。

上述程式,主要是寫在main中,這有一個缺點,你會看不到Interface是如何提供Service,並讓User更簡單的使用你所提供的Lib。
假設Rect,Circle,與Geometry Interface是寫在一個Lib上,並透過go get下載得到。當你在使用此Lib,我們暫時叫做shape的lib。 我們會import "shape"並使用它透過shape.rect{3,2},並直接使用shape.Measure()來調用。任何型態都可放入shape.Measure()中,比如shape.Measure(Rect),透過這樣的瞭解,我相信,Interface的目的就更容易凸顯出來了。
此外此代碼部分,你可以看到Rect.area()其實是個private函數,User是無法使用的,只能透過Measure來使用,這也是從傳統走入Inteface的一個差別,當然,你已可以改成大寫,就是個Public函數了。

最後,我們還沒定義何謂User,何謂Programmer。 在這樣的範例中,我定義的programmer其實是指的撰寫shape的人,而user是用go get下載,準備使用此Lib的人。

對Interface的結論

對User而言,只會看到Data與Service。
對Programmer而言不只要寫傳統的定義,還得從新定義Interface所要帶來的Service。

Friday, March 11, 2016

Shall we need Mongodb Arbiter in 3 nodes MongoDB cluster (Replca-Set)

mongodb3nodesrep

前言

一直沒搞清楚,Mongodb在三台Cluster Replicate-Set的情況下,到底需不需要Arbiter(兩台Data Node)。
能夠最有效的利用空間的最好的情況下是三台皆為Data Node,這樣我可以壞兩台才會變成Read-Only mode,否則使用Arbiter壞了一台就變成Read-Ony mode了。

問題是,如果三台皆為Data Node,任何一台FAIL,會導致投票失敗,而無法選出PRIMARY嗎?

答案是,可以使用3台皆為Data Node的模式,任何一台Node Fail(PRIMARY or SECONDARY) 都可以找到PRIMARY,完全不需要Arbiter。

MongoDB安裝

感謝此篇文章,但安裝過程中有些問題,因此,我重新寫了整個過程。

http://blog.toright.com/posts/4508/mongodb-replica-set-%E9%AB%98%E5%8F%AF%E7%94%A8%E6%80%A7%E6%9E%B6%E6%A7%8B%E6%90%AD%E5%BB%BA.html

環境

共有三台Server,分別為 mongodb01, mongodb02, mongodb03。
OS: Ubuntu 14.04.2

安裝套件

於三台Servers 安裝mongodb 3.0

sudo apt-key adv –keyserver hkp://keyserver.ubuntu.com:80 –recv 7F0CEB10

echo “deb http://repo.mongodb.org/apt/ubuntu trusty/mongodb-org/3.0 multiverse" | sudo tee /etc/apt/sources.list.d/mongodb-org-3.0.list

sudo apt-get update

sudo apt-get install -y mongodb-org --force-yes

MongoDB需要hostname作為識別,因此三台Servers皆需要放置彼此的hostname作為識別。
編輯三台Servers的 /etc/hosts

127.0.0.1       localhost
# The following lines are desirable for IPv6 capable hosts
::1     localhost ip6-localhost ip6-loopback
ff02::1 ip6-allnodes
ff02::2 ip6-allrouters

172.16.235.128 mongodb01
172.16.235.148 mongodb02
172.16.235.149 mongodb03

編輯三台Servers

sudo mkdir -p /var/lib/mongodb/rs-a
sudo chown -R mongodb:mongodb /var/lib/mongodb/rs-a

並編輯三台Servers的**/etc/mongod.conf

storage:
  dbPath: /var/lib/mongodb/rs-a
  journal:
    enabled: true
 
systemLog:
  destination: file
  logAppend: true
  path: /var/log/mongodb/mongod.log
 
net:
  port: 27019
  bindIp: 0.0.0.0

restart 三台Servers

service mongod restart

到第一台Server編輯 mongo mongodb01:27019 繼續輸入如下 (第一台Server)

use admin
db.createUser( {
    user: "myUserAdmin",
    pwd: "<password>",
    roles: [ { role: "userAdminAnyDatabase", db: "admin" } ]
  });
db.createUser( {
    user: "siteRootAdmin",
    pwd: "<password>",
    roles: [ { role: "root", db: "admin" } ]
  });

第一台Server建立Key

openssl rand -base64 741 > /var/lib/mongodb/mongodb-keyfile
scp /var/lib/mongodb/mongodb-keyfile root@mongodb02:/var/lib/mongodb/mongodb-keyfile
scp /var/lib/mongodb/mongodb-keyfile root@mongodb03:/var/lib/mongodb/mongodb-keyfile

到每一台Server執行以下命令

chmod 600 /var/lib/mongodb/mongodb-keyfile
chown mongodb.mongodb /var/lib/mongodb/mongodb-keyfile

於三台Servers,編輯vim /etc/mongod.conf

security:
  keyFile: /var/lib/mongodb/mongodb-keyfile
 
replication:
  replSetName: rs-a

於三台Servers執行

sudo service mongod restart

到此MongoDB每一台的環境設定都好了,包含Cluster Key。

設定Cluster

到第一台Server

mongo mongodb01:27019

到第一台Server並執行以下

use admin
db.auth("siteRootAdmin", "<password>");
rs.initiate()
rs.conf()

不要退出,繼續執行

rs.add("mongodb02:27019")
rs.add("mongodb03:27019")
rs.status()

透過rs.status(),你可以查看到這三台Server的狀態,以本次實驗的狀態為

01 02 03
PRIMARY SECONDARY SECONDARY

如何登入設定並檢查Cluster狀態

進入任何一台Server執行以下,以01為例

mongo mongodb01:27019
use admin
db.auth("siteRootAdmin", "<password>");
rs.status()

Server Fail Over Testing

我測試了幾種Fail over情況藉以了解MongoDB對PRIMARY,SECONDARY,選擇的情況。
以下為測試結果。

status 01 02 03
X PRIMARY SECONDARY SECONDARY
FAIL01 X PRIMARY SECONDARY
BACK01 SECONDARY PRIMARY SECONDARY
FAIL02 PRIMARY X SECONDARY
FAIL02 FAIL01 X X SECONDARY
BACK01 FAIL02 SECONDARY X PRIMARY
FAIL02 FAIL03 SECONDARY X X
BACK03 FAIL02 PRIMARY X SECONDARY
BACK02 PRIMARY SECONDARY SECONDARY

單台Fail Over實驗

到底需不需要Arbiter來支援,三台MongoDB Servers的環境。
假設01 Fail,02與03會投票決定誰是PRIMARY。 理論上會有1/2的機會會投錯才是(同時投給對方,或投給自己)。
我們透過實驗來瞭解一下,我們每次都關閉PRIMARY,看是否其他兩台會繼承PRIMARY的工作。
最後,我們再啟動關閉的那台Server,在反覆的操作關閉PRIMARY的實驗。

ok表此次實驗,投票有找到PRIMARY。

test result
1 ok
2 ok
3 ok
4 ok
5 ok
6 ok
7 ok
8 ok
9 ok
10 ok
11 ok
12 ok

在這12次的過程中,有幾次是兩台皆為SECONDARY,再過幾秒後(<10secs),才找到PRIMARY。換句話說,也有幾次一下子就找到PRIMARY。
因此,我猜,投票可能會產生皆為SECONDARY的狀態,但MongoDB會重新處理這樣的狀態,讓PRIMARY順利選出。

所以,答案是,在三台Cluster的情況下,Fail任何一台都可以找到PRIMARY。
當然如果Fail兩台,則剩下的唯一一台一定是SECONDARY(READ-ONLY)。

3 Nodes Keepalived Testing

keepalived3nodes

前言

工作中一直聽到一個奇怪的謠言說,Keepalived只能夠用在兩台機器上,想不透VRRP怎麼會有這樣的限制。
只好找時間來測試一下,果然,就是個謠言,Keepalived支持多台的Fail Over。
以下為三台的測試script與結果。

架構

在VMware環境下,三台虛機,IP分別為172.16.235.128, 172.16.235.147, 172.16.235.148。
我們配置,VIP為172.16.235.200。
以下為/etc/keepalived/keepalived.conf的配置,三台都一樣。

vrrp_instance VI_1 {
    state BACKUP
    interface eth0
    dont_track_primary
    nopreempt
    virtual_router_id 51
    priority 150
    advert_int 1
    authentication {
        auth_type PASS
        auth_pass $ PASS
    }
    virtual_ipaddress {
        172.16.235.200
    }
}

三台都設定state BACKUP原因為不讓某server啟動後Fail-Back。

測試

依序關機擁有VIP的機器,VIP migrates到第三台機器,因此,得證,Keepalived可在多台的環境下工作。

Wednesday, March 9, 2016

golang的VI環境設定

golangvim

Golang的VI環境設定

之前文章有談到sublime寫Golang code,

http://gogosatellite.blogspot.tw/2016/01/gosub-span-display-block-overflow.html
http://gogosatellite.blogspot.tw/2016/02/golang.html

現在我們來試試看VI。
一直以來我都是用VI寫code,原因是,手可以不用離開鍵盤。
原本以為讓Golang在VI的環境下完成,Auto-completion,color,trace code,會很困難。
沒想到,出乎意料的簡單。

UPdate VIM

For Ubuntu14.04 Origin Vim Version is 7.4.52 that cannot support Golang plugin well. So before we started to install Golang, let's update vim first.

add-apt-repository ppa:pkg-vim/vim-daily
apt-get update
apt-get install vim

Now the vim upgrade to version 7.4.882

以下開始安裝

root@golang15:~# curl -O https://storage.googleapis.com/golang/go1.5.linux-amd64.tar.gz
  % Total    % Received % Xferd  Average Speed   Time    Time     Time  Current
                                 Dload  Upload   Total   Spent    Left  Speed
100 74.2M  100 74.2M    0     0  4811k      0  0:00:15  0:00:15 --:--:-- 5183k
tar -zxvf go1.5.linux-amd64.tar.gz
mv -f go /usr/local/
root@golang15:~# go version
The program 'go' is currently not installed. You can install it by typing:
apt-get install gccgo-go

However, do not install it. It's just due to GO PATH is not setting well.

Now we adding go path to system PATH.

root@golang15:~# export PATH=$PATH:/usr/local/go/bin
root@golang15:~# go version
go version go1.5 linux/amd64

Now it works.

Let's try a simple Golang Code.

root@golang15:~# cp /usr/local/go/test/helloworld.go .
root@golang15:~# go run helloworld.go
hello, world

Great.

以下開始設定VIM開發環境

安裝git apt-get install git

git clone https://github.com/VundleVim/Vundle.vim.git ~/.vim/bundle/Vundle.vim

編輯.vimrc

set nocompatible
syntax on
filetype off
set rtp+=~/.vim/bundle/Vundle.vim
call vundle#begin()
Plugin 'VundleVim/Vundle.vim'
Plugin 'fatih/vim-go'
Plugin 'kien/ctrlp.vim'
Plugin 'scrooloose/nerdtree'
Plugin 'Townk/vim-autoclose'
Plugin 'SirVer/ultisnips'
call vundle#end()
filetype plugin indent on
au BufNewFile,BufRead *.go setlocal noet ts=4 sw=4 sts=4

if has("autocmd")
           autocmd BufRead *.txt set tw=78
              autocmd BufReadPost *
                    \ if line("'\"") > 0 && line ("'\"") <= line("$") |
                    \   exe "normal g'\"" |
                   \ endif
      endif ""'")


let g:NERDTreeDirArrows=0
" UltiSnips setting
 let g:UltiSnipsExpandTrigger="<tab>"
 let g:UltiSnipsJumpForwardTrigger="<c-b>"
 let g:UltiSnipsJumpBackwardTrigger="<c-z>"

let mapleader = ","

" vim-go custom mappings
" au FileType go nmap <Leader>s <Plug>(go-implements)
" au FileType go nmap <Leader>i <Plug>(go-info)
" au FileType go nmap <Leader>gd <Plug>(go-doc)
" au FileType go nmap <Leader>gv <Plug>(go-doc-vertical)
 au FileType go nmap <leader>r <Plug>(go-run)
" au FileType go nmap <leader>b <Plug>(go-build)
" au FileType go nmap <leader>t <Plug>(go-test)
" au FileType go nmap <leader>c <Plug>(go-coverage)
" au FileType go nmap <Leader>ds <Plug>(go-def-split)
" au FileType go nmap <Leader>dv <Plug>(go-def-vertical)
" au FileType go nmap <Leader>dt <Plug>(go-def-tab)
" au FileType go nmap <Leader>e <Plug>(go-rename)

接著在console下執行VI Plugin的安裝

Started install Plugin setting in .vim vim +PluginInstall +qall You will see all the package installed in .vim/bundle directory.

Now we install it.

export GOPATH=/usr/local/go/src/
vim
:GoInstallBinaries 

The package will be installed to GOPATH/bin directory.

And you will see

vim-go: gocode not found. Installing github.com/nsf/gocode to folder /usr/local/go/src//b
in/
vim-go: gometalinter not found. Installing github.com/alecthomas/gometalinter to folder /
usr/local/go/src//bin/
.
.
.
.

InstallBinary會稍微慢些,要有點耐心,會執行完的。

上述簡單幾個操作,基本上,你已完成了所有的設定,你可以找個函數試試看

package main

import "fmt"

func main() {
    print("hello, world\n")
    fmt.
}

after . try the following command, you will see the auto-completion.

ctrl-x ctrl-o

Adding Persistent Setting

GOPATH Setting

edit /etc/profile.d/golang.sh

root@golang15env# cat /etc/profile.d/golang.sh 
export GOROOT=/usr/local/go
export PATH=$PATH:$GOROOT/bin
export GOPATH=/root/golang/projects/wru
export GOBIN=$GOPATH/bin
export GOARCH=amd64
export GOOS=linux

Problems

The problem is we set GOPATH is in the /usr/local/go/src, and all the VIM is installed in GOPATH/bin.

Now we need to copy all the vim data to working directory.

cp /usr/local/go/src/bin $GOPATH/bin

Reboot

Now we can reboot the OS and you will found the setting is persistent.

Adding library

go get github.com/gorilla/mux

you will see the library

root@golang15env:# ls ../../pkg/linux_amd64/github.com/gorilla/
context.a  mux.a

We modify our code.

package main

import (
    "fmt"
    "github.com/gorilla/mux"
)

func main() {
    print("hello, world\n")
    fmt.Println("aaa")
    mux.
}

auto-complete the mux., it's failed.

The way to do it is to copy the library to GOROOT related directory

cp ../../../pkg/linux_amd64/github.com/gorilla /usr/local/go/pkg/linux_amd64/github.com/. -rf

Now you can test c-x c-o again.

Build Code

see this http://gogosatellite.blogspot.tw/2016/02/golang.html

Advanced Skill

Great Video.

https://www.youtube.com/watch?v=7BqJ8dzygtU&t=5s

trace code

以前用C語言的時候用ctags,沒想到golang有gotags,而且安裝與使用都非常簡單。
首先下載gotags的源碼

git clone git://github.com/jimweirich/gotags.git
cd gotags/src/onestepback.org/gotags/
go build *
cp gotags /usr/local/bin

這時你可以到你要做tags的目錄去執行

gotags *

用vi開啟你要trace的代碼,並透過下列兩行指令可以輕鬆追代碼。

ctrl-]  進入下一層
ctrl-o  回到上一層

好了,Auto-completion,color,trace code,全部設定完畢。
可以用VI寫Golang了。

Wednesday, March 2, 2016

keystone的實驗 - 賦予Domain/Tenant Endpoint - 失敗

keystone

前言

這是一個失敗的未完成的實驗,目的是想讓Domain or Tenant有自己的Region,藉此達到OpenStack橫向擴展性達到可能。

結論是,無法利用目前的OpenStack做到此目的。 但可以透過Domain與Region的mapping達到此功能,但這部分就不說了。

Before Installation, Upgrade Your System First.

# apt-get install ubuntu-cloud-keyring
# echo "deb http://ubuntu-cloud.archive.canonical.com/ubuntu" \
  "trusty-updates/kilo main" > /etc/apt/sources.list.d/cloudarchive-kilo.list

install mysql-server-5.6

apt-get install mysql-server-5.6

set up mysql, we set password as root. mysql -u root -pshark CREATE DATABASE keystone; GRANT ALL PRIVILEGES ON keystone.* TO 'keystone'@'localhost' IDENTIFIED BY 'root'; GRANT ALL PRIVILEGES ON keystone.* TO 'keystone'@'%' IDENTIFIED BY 'root';

setup /etc/mysql/my.cnf

[mysqld]
.
.
.
bind-address            = 0.0.0.0

To avoid keystone start automatically

echo "manual" > /etc/init/keystone.override

install package

apt-get install keystone python-openstackclient apache2 libapache2-mod-wsgi memcached python-memcache
apt-get install python-mysqldb

vim /etc/keystone/keystone.conf

[DEFAULT]
...
admin_token = iamadmin ## Replace 43405b090eda983ddde2 with a random that you generated earlier
verbose = True

[database]
...
connection = mysql://keystone:iamadmin@controller/keystone  ## Replace PASSWD with your KeyStone DB password
[memcache]
...
servers = localhost:11211
[token]
...
provider = keystone.token.providers.uuid.Provider
driver = keystone.token.persistence.backends.memcache.Token
[revoke]
...
driver = keystone.contrib.revoke.backends.sql.Revoke

To make db sync

keystone-manage db_sync

edit /etc/apache2/apache2.conf

ServerName controller

edit /etc/apache2/sites-enabled/wsgi-keystone.conf

Listen 5000
Listen 35357

<VirtualHost *:5000>
    WSGIDaemonProcess keystone-public processes=5 threads=1 user=keystone display-name=%{GROUP}
    WSGIProcessGroup keystone-public
    WSGIScriptAlias / /var/www/cgi-bin/keystone/main
    WSGIApplicationGroup %{GLOBAL}
    WSGIPassAuthorization On
    <IfVersion >= 2.4>
      ErrorLogFormat "%{cu}t %M"
    </IfVersion>
    LogLevel info
    ErrorLog /var/log/apache2/keystone-error.log
    CustomLog /var/log/apache2/keystone-access.log combined
</VirtualHost>

<VirtualHost *:35357>
    WSGIDaemonProcess keystone-admin processes=5 threads=1 user=keystone display-name=%{GROUP}
    WSGIProcessGroup keystone-admin
    WSGIScriptAlias / /var/www/cgi-bin/keystone/admin
    WSGIApplicationGroup %{GLOBAL}
    WSGIPassAuthorization On
    <IfVersion >= 2.4>
      ErrorLogFormat "%{cu}t %M"
    </IfVersion>
    LogLevel info
    ErrorLog /var/log/apache2/keystone-error.log
    CustomLog /var/log/apache2/keystone-access.log combined
</VirtualHost>

and Then

mkdir -p /var/www/cgi-bin/keystone
curl http://git.openstack.org/cgit/openstack/keystone/plain/httpd/keystone.py?h=stable/kilo | tee /var/www/cgi-bin/keystone/main /var/www/cgi-bin/keystone/admin

chown -R keystone:keystone /var/www/cgi-bin/keystone
chmod 755 /var/www/cgi-bin/keystone/*

service apache2 restart

Start To Operate Keystone

export OS_TOKEN=iamadmin
export OS_URL=http://controller:35357/v2.0
openstack service create --name keystone --description "OpenStack Identity" identity
openstack service list

To setup Region Endpoint

openstack endpoint create \
--publicurl http://controller:5000/v2.0 \
--internalurl http://controller:5000/v2.0 \
--adminurl http://controller:35357/v2.0 \
--region RegionOne \
identity

openstack endpoint list

To Setup Second Region with Another Endpoint

openstack endpoint create \
--publicurl http://controller:5000/v2.0 \
--internalurl http://controller:5000/v2.0 \
--adminurl http://controller:35357/v2.0 \
--region RegionTwo \
identity

openstack endpoint list

One can use Keystone command line

export OS_TOKEN=iamadmin
export OS_SERVICE_ENDPOINT=http://controller:35357/v2.0

Now you can use Keystone command line

keystone endpoint-list
keystone tenant-create --name service1 --description "Service Tenant"

keystone service-create --name service1 --type service1

keystone endpoint-create --region RegionTwo --service-id 8f1ce2e503ba4fbcb095e8469200b8e4 --publicurl http://haha/v2 --adminurl http://lala/v2 --internalurl http://sasa/v2
curl -d @token-request.json -H "Content-type: application/json" http://localhost:5000/v3/auth/tokens |python -m json.tool
{
    "auth": {
        "identity": {
            "methods": [
                "password"
            ],
            "password": {
                "user": {
                    "domain": {
                        "name": "Default"
                    },
                    "name": "newuser",
                    "password": "newuser"
                }
            }
        }
    }
}

Every request will get all Region informations and all endpoint information. You may try it to understand it. We cannot bind a user to a region.

To access v2.0 API use 35357 port by default but v3 use 5000 port.

透過OS-Catalog完成賦予tenant一個endpoint

curl -d @add_endpoint.json -X POST -H 'X-Auth-Token:iamadmin' http://localhost:35357/v2.0/tenants//OS-KSCAT-/258b879e4df748caa1bac3416d38a819|python -m json.tool

遭遇了問題

OS-CAT-ALOG這個extension看來沒放在keystone裏了,Tenant assigns endpoint沒法做。 目前無法透過現有的Keystone達成對Domain指定Region的功能。